Thứ Tư, 25 tháng 12, 2019

Docker Commands

  • docker attach - Attaches your local input/output/error stream to a running container.
  • docker commit  - Creates a new image from the current changed state of the container.
  • docker exec- Runs a command in a container that is active or running.
  • docker history- Displays the history of an image.
  • docker info- Shows system-wide information.
  • docker inspect- Finds system-level information about docker containers and images.
  • docker login- Logins to local registry or Docker Hub.
  • docker pull- Pulls an image or a repository from your local registry or Docker Hub.
  • docker ps- Lists various properties of containers.
  • docker restart- Stops and starts a container.
  • docker rm- Remove containers.
  • docker rmi- Remove images
  • docker run- Runs a command in an isolated container.
  • docker search- Searches the Docker Hub for images.
  • docker start- Starts already stopped containers.
  • docker stop- Stops running containers.
  • docker version- Provides docker version information.

Build

Build an image from the Dockerfile in the
current directory and tag the image
docker build -t myimage:1.0 .
List all images that are locally stored with
the Docker Engine
docker image ls
Delete an image from the local image store
docker image rm alpine:3.4

Share

Pull an image from a registry
docker pull myimage:1.0
Retag a local image with a new image name
and tag
docker tag myimage:1.0 myrepo/
myimage:2.0
Push an image to a registry
docker push myrepo/myimage:2.0 

Run

Run a container from the Alpine version 3.9
image, name the running container
“web” and expose port 5000 externally,
mapped to port 80 inside the container.
docker container run --name web -p
5000:80 alpine:3.9
Stop a running container through SIGTERM
docker container stop web
Stop a running container through SIGKILL
docker container kill web
List the networks
docker network ls
Run
List the running containers (add --all to
include stopped containers)
docker container ls
Delete all running and stopped containers
docker container rm -f $(docker ps -aq)
Print the last 100
lines of a container’s logs
docker container
logs --tail 100 web

Docker Management

All commands below are called as options to the base
docker command. Run docker <command> --help
for more information on a particular command.

app* Docker Application
assemble* Framework-aware builds (Docker Enterprise)
builder Manage builds
cluster Manage Docker clusters (Docker Enterprise)
config Manage Docker configs
context Manage contexts
engine Manage the docker Engine
image Manage images
network Manage networks
node Manage Swarm nodes
plugin Manage plugins
registry* Manage Docker registries
secret Manage Docker secrets
service Manage services
stack Manage Docker stacks
swarm Manage swarm
system Manage Docker
template* Quickly scaffold services (Docker Enterprise)
trust Manage trust on Docker images
volume Manage volumes
Read More

Thứ Tư, 18 tháng 12, 2019

GlusterFS Cheat Sheet

Brick –> is basic storage (directory) on a server in the trusted storage pool.
Volume –> is a logical collection of bricks.
Cluster –> is a group of linked computers, working together as a single computer.
Distributed File System –> A filesystem in which the data is spread across the multiple storage nodes and allows the clients to access it over a network.
Client –> is a machine which mounts the volume.
Server –> is a machine where the actual file system is hosted in which the data will be stored.
Replicate –> Making multiple copies of data to achieve high redundancy.
Fuse –> is a loadable kernel module that lets non-privileged users create their own file systems without editing kernel code.
glusterd –> is a daemon that runs on all servers in the trusted storage pool.
RAID –> Redundant Array of Inexpensive Disks (RAID) is a technology that provides increased storage reliability through redundancy
TCP ports 111, 24007,24008  on all Gluster servers
TCP port  24009-(24009 + number of bricks across all volumes) on all Gluster servers
TCP port 24009 to 24014 -> 5 bricks for each

 glusterfs -V -> Check the version of installed glusterfs
 gluster -> Gluster Console Manager in interactive mode

 sudo vi /etc/hosts -> modify /etc/hosts file if DNS is N\A
 192.168.13.16  gluster1.storage.local  gluster1
 192.168.13.17  gluster2.storage.local  gluster2
 192.168.13.20  client.storage.local    client

 gluster peer status -> Verify the status of the trusted storage pool
 gluster peer probe gluster2-server ->  Add servers to the trusted storage pool
 gluster peer detach gluster2-server -> Remove a server in storage pool
 gluster pool list -> List the storage pool.


 mkdir -p /data/gluster/gvol0 -> Create a brick (directory) called “gvol0” in the mounted file system on both nodes
 gluster volume create gvol0 replica 2 gluster1.storage.local:/data/gluster/gvol0 gluster2.storage.local:/data/gluster/gvol0
 volume create: gvol0 -> Create the volume named “gvol0” with two replicas
 gluster volume start gvol0 -> Start volume
 gluster volume info -> Show the volume information
 gluster volume info gvol0 -> Show the volume information of volume gvol0
 gluster volume start test-volume -> Start volume

 mkfs.ext4 /dev/sdb1 -> Format partition
 mkdir -p /data/gluster -> Create directory called /data/gluster
 mount /dev/sdb1 /data/gluster -> Mount the disk on a directory called /data/gluster

 mount -t glusterfs gluster1-server:/test-volume /mnt/glusterfs -> Mount a Gluster volume on all Gluster servers
 cat /proc/mounts | grep glusterfs

 #/etc/fstab
 storage.example.lan:/test-volume       /mnt  glusterfs   defaults,_netdev  0  0
 gluster1-server:/test-volume /mnt/glusterfs glusterfs defaults,_netdev 0 0 -> Edit the /etc/fstab file on all Gluster servers
 echo "/dev/sdb1 /data/gluster ext4 defaults 0 0" | sudo tee --append /etc/fstab ->Add an entry to /etc/fstab


 sudo iptables -I INPUT -p all -s <ip-address> -j ACCEPT -> Configure the firewall to allow all connections within a cluster

 Redhat Based Systems
 chkconfig glusterd on -> Start the glusterd daemon every time the system boots

 Debian Based Systems
 sudo service glusterfs-server start ->Start the glusterfs-server service on all gluster nodes

 Clients
 dmesg | grep -i fuse -> Verify FUSE module is installed
 mkdir -p /mnt/glusterfs -> Create a directory to mount the GlusterFS filesystem
 mount -t glusterfs gluster1.storage.local:/gvol0 /mnt/glusterfs -> Mount the GlusterFS filesystem to /mnt/glusterfs
 df -hP /mnt/glusterfs -> Verify the mounted GlusterFS filesystem
 gluster1.storage.local:/gvol0 /mnt/glusterfs glusterfs  defaults,_netdev 0 0 -> Add to /etc/fstab for automatically mounting

Benchmarking && Testing

Servers
mount -t glusterfs gluster1.storage.local:/gvol0 /mnt -> Mount GlusterFS volume on the same storage node
/mnt directory ->  Data inside the /mnt directory of both nodes will always be same (replication).
ls -l /mnt/ ->  Verify the created files
poweroff -> Shutdown gluster node to test HA on client

Clients
touch /mnt/glusterfs/file1 -> Create some files on the mounted filesystem
ls -l /mnt/glusterfs/ ->  Verify the created files


Tuning
gluster volume set gvol0 network.ping-timeout "5" ->  set network ping timeout to 5 seconds from default 42 on all gluster nodes
gluster volume get gvol0 network.ping-timeout -> Verify network ping timeout
network.ping-timeout default 42 Secs-> The time duration for which the client waits to check if the server is responsive. When a ping timeout happens, there is a network disconnect between the client and server. All resources held by server on behalf of the client get cleaned up. When a reconnection happens, all resources will need to be re-acquired before the client can resume its operations on the server. Additionally, the locks will be acquired and the lock tables updated. This reconnect is a very expensive operation and should be avoided.

RDMA
Process glusterd will listen on both tcp and rdma if rdma device is found. Port used for rdma is 24008.

troubleshooting
sudo glusterd --debug
sudo netstat -ntlp | grep gluster
netstat -tlpn | grep 24007

#https://docs.gluster.org/en/v3/Administrator%20Guide/Setting%20Up%20Clients/
#https://docs.gluster.org/en/v3/Install-Guide/Install/
   41  sudo apt-get install -y software-properties-common
   42  sudo add-apt-repository ppa:gluster/glusterfs-3.13 -y
   43  sudo apt-get update
   44  sudo apt-get install glusterfs-server=3.13.2-1build1
   45  sudo service glusterfs-server start
   47  sudo service glusterd status
   48  sudo service glusterd restart 

 
  #Gluster 3.10 (Stable)
  #https://www.gluster.org/install/
sudo systemctl disable ufw
sudo systemctl stop ufw
sudo systemctl status ufw
hostnamectl set-hostname gluster2
sudo vi /etc/hosts
ping -c2 gluster1
ping -c2 gluster2
sudo apt-get install -y software-properties-common
sudo add-apt-repository ppa:gluster/glusterfs-3.10
sudo apt-get update -y
sudo apt-get install glusterfs-server -y
glusterfs --version
gluster peer probe gluster1
sudo systemctl start glusterd
sudo systemctl enable glusterd
sudo gluster volume create gvol0 replica 2 gluster1.example.lan:/data/gluster/gvol0 gluster2.example.lan:/data/gluster/gvol0
sudo gluster volume start test-volume
sudo gluster volume info test-volume
sudo gluster volume set test-volume network.ping-timeout 3
# glusterfs client
sudo apt-get install -y glusterfs-client
mkdir -p /mnt/glusterfs
mount -t glusterfs gluster1.example.lan:/data/gluster/gvol0 /mnt/glusterfs
echo 'gluster1.example.lan:/data/gluster/gvol0 /mnt/glusterfs glusterfs defaults,_netdev 0 0' >> /etc/fstab
Read More

Thứ Sáu, 29 tháng 11, 2019

Install PowerDNS with recursor and MySQL backend

PowerDNS is not designed to provide recursive results. It is intended to act only as an authoritative server for the domains it serves. This implies it will be serving domain data to other hosts.

Install pdns and pdns-recursor

sudo apt-get install pdns-server pdns-recursor
  • edit recursor settings in /etc/powerdns/recursor.conf
local-port=53

forward-zones=mydomain.local=127.0.0.1:54 # change ‘mydomain.local’ to your domain that you’ll be hosting in PowerDNS 
  • edit pdns settings in /etc/powerdns/pdns.conf
local-port=54

launch=gmysql
gmysql-host=127.0.0.1
gmysql-user=root
gmysql-dbname=pdns
gmysql-password=mysecretpassword

MySQL

  • install mysql server
  • install module for pdns
sudo apt-get install pdns-backend-mysql
  • add data to mysql


INSERT INTO domains (name, type) values ('my.local', 'NATIVE');

INSERT INTO records (domain_id, name, content, type,ttl,prio)
VALUES (1,'my.local','51.0.1.21','A',120,NULL);


INSERT INTO records (domain_id, name, content, type,ttl,prio)
VALUES (1,'my.local','localhost ahu@ds9a.nl 1','SOA',86400,NULL);

INSERT INTO records (domain_id, name, content, type,ttl,prio)
VALUES (1,'my.local','dns-us1.powerdns.net','NS',86400,NULL);

INSERT INTO records (domain_id, name, content, type,ttl,prio)
VALUES (1,'my.local','dns-eu1.powerdns.net','NS',86400,NULL);


INSERT INTO records (domain_id, name, content, type,ttl,prio)
VALUES (1,'mail.my.local','192.0.2.12','A',120,NULL);

INSERT INTO records (domain_id, name, content, type,ttl,prio)
VALUES (1,'my.local','mail.my.local','MX',120,25);

Start

  • start pdns and pdns-recursor
sudo /etc/init.d/pdns-recursor start
sudo /etc/init.d/pdns start
  • check
nslookup linode.com 127.0.0.1

This should work, if it doesn’t, check /var/log/syslog for messages from the recursor
dig mydomain.local @127.0.0.1 -p 54
Read More

Thứ Ba, 5 tháng 11, 2019

Large MSDB Database From sysmaintplan_logdetail Table

I recently received a panicked call from a client who had a SQL instance go down because the server’s C drive was full. As the guy looked he found that the msdb database file was 31 GB and was consuming all of the free space on the OS drive causing SQL to shut down. He cleaned up some other old files so that SQL would work again but did not know what to do about msdb.
This query returns the top list of objects and their size:
USE msdb
GO

SELECT TOP(10)
      o.[object_id]
    , obj = SCHEMA_NAME(o.[schema_id]) + '.' + o.name
    , o.[type]
    , i.total_rows
    , i.total_size
FROM sys.objects o
JOIN (
    SELECT
          i.[object_id]
        , total_size = CAST(SUM(a.total_pages) * 8. / 1024 AS DECIMAL(18,2))
        , total_rows = SUM(CASE WHEN i.index_id IN (0, 1) AND a.[type] = 1 THEN p.[rows] END)
    FROM sys.indexes i
    JOIN sys.partitions p ON i.[object_id] = p.[object_id] AND i.index_id = p.index_id
    JOIN sys.allocation_units a ON p.[partition_id] = a.container_id
    WHERE i.is_disabled = 0
        AND i.is_hypothetical = 0
    GROUP BY i.[object_id]
) i ON o.[object_id] = i.[object_id]
WHERE o.[type] IN ('V', 'U', 'S')
ORDER BY i.total_size DESC
As we looked at it together I found that the sysmaintplan_logdetail table was taking all the space in the database. The SQL Agent had been set to only keep about 10000 rows of history but for some unknown reason the table never removed history. After consulting MSDN I found this code did the trick for truncating this table.
USE msdb
GO
ALTER TABLE [dbo].[sysmaintplan_log] DROP CONSTRAINT [FK_sysmaintplan_log_subplan_id];
GO
ALTER TABLE [dbo].[sysmaintplan_logdetail] DROP CONSTRAINT [FK_sysmaintplan_log_detail_task_id];
GO
TRUNCATE TABLE msdb.dbo.sysmaintplan_logdetail;
GO
TRUNCATE TABLE msdb.dbo.sysmaintplan_log;
GO
ALTER TABLE [dbo].[sysmaintplan_log] WITH CHECK ADD CONSTRAINT [FK_sysmaintplan_log_subplan_id] FOREIGN KEY([subplan_id])
REFERENCES [dbo].[sysmaintplan_subplans] ([subplan_id]);
GO
ALTER TABLE [dbo].[sysmaintplan_logdetail] WITH CHECK ADD CONSTRAINT [FK_sysmaintplan_log_detail_task_id] FOREIGN KEY([task_detail_id])
REFERENCES [dbo].[sysmaintplan_log] ([task_detail_id]) ON DELETE CASCADE;
GO
After the table was truncated we were able to shrink the database to about 1 GB. For the record – I hate, hate, hate to shrink databases but there were no other options left to us and we had to clear out some room on the drive.
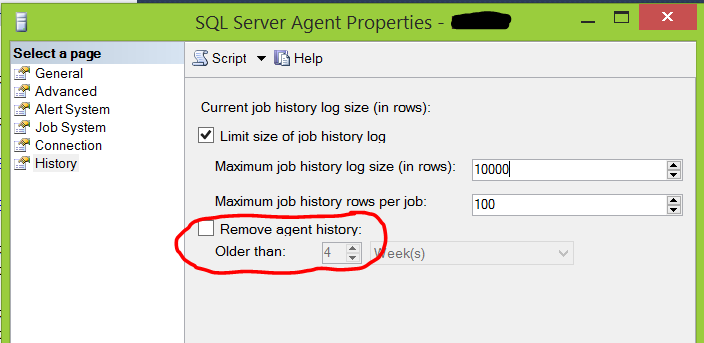
Now with the crisis averted we checked the SQL Agent settings and found that the box to remove agent history was not checked.
Blog_20150702_1
We checked it, hit OK then opened the SQL Agent properties again only to find that the box was unchecked. After doing some research I found that this is a bug that has not been resolved even in SQL 2014.   https://connect.microsoft.com/SQLServer/feedback/details/172026/ssms-vs-sqlagent-automatically-remove-agent-history-bugs Awesome, huh?!
If you check the link there is a workaround posted. I have tested it and found that it takes a super long time to run sp_purge_jobhistory and my test server only has 2 jobs that would have any history at all. So, use the workaround if you feel brave. Hopefully Microsoft will actually fix this some time. Until then, keep an eye on your msdb database size.
For more information about blog posts, concepts and definitions, further explanations, or questions you may have…please contact us at SQLRxSupport@sqlrx.com. We will be happy to help! Leave a comment and feel free to track back to us. We love to talk tech with anyone in our SQL family!
Read More

Thứ Ba, 29 tháng 10, 2019

How to configure the passive ports range for ProFTPd on a server behind a firewall

Note: When configuring the passive port range, a selected port range must be in the non-privileged range (e.g., greater than or equal to 1024). It is strongly recommended that the chosen range should be large enough to handle many simultaneous passive connections. The default passive port range is 49152-65535 (the IANA registered ephemeral port range).
  1. Connect to a server via SSH.
  2. Run the command below to check if the passive port range is configured in the FTP server:
    sed -n '/\<Global/,/\/Global/p' /etc/proftpd.conf /etc/proftpd.d/* | grep PassivePorts
    If the command returns the same output as below, the passive port range is set up in ProFTPd configuration. Continue to step 3.
    PassivePorts 49152 65535
    If no output is returned, configure the passive port range:
    2.1. Create the /etc/proftpd.d/55-passive-ports.conf file using the following command:
    touch /etc/proftpd.d/55-passive-ports.conf
    2.2. Open the /etc/proftpd.d/55-passive-ports.conf file in a text editor. In this example, we use the vi editor:
    vi /etc/proftpd.d/55-passive-ports.conf
    2.3. Paste the content below in the file:
    <Global>
    PassivePorts 49152 65535
    </Global>
    2.4. Save the changes and close the file.
  3. Enable the kernel modules in the system:
    Note: Actions that involves kernel modules configuration should be performed on a physical or a virtual machine with full hardware emulation. If a VZ container is used, the same actions should be performed on a hardware node where this VZ container is running.
    3.1. Enable the nf_conntrack_ftp module:
    /sbin/modprobe nf_conntrack_ftp
    3.2. If the server is behind the NAT (private IP address is configured in the system), enable the kernel nf_nat_ftp module as well:
    /sbin/modprobe nf_nat_ftp
    3.3. Verify the changes:
    lsmod | grep nf_nat_ftp
    nf_nat_ftp 16384 0
    nf_conntrack_ftp 20480 1 nf_nat_ftp
    nf_nat 32768 1 nf_nat_ftp
    nf_conntrack 131072 3 nf_conntrack_ftp,nf_nat_ftp,nf_nat
    3.4. To keep the changes after a system reboot, apply these steps:
    • Add the modules to the /etc/modules-load.d/modules.conf file with these commands:
      echo nf_nat_ftp >> /etc/modules-load.d/modules.conf
      # echo nf_conntrack_ftp >> /etc/modules-load.d/modules.conf
    • On CentOS/RHEL-based distributions, add the modules to the IPTABLES_MODULES line in the /etc/sysconfig/iptables-config file as follows:
      cat /etc/sysconfig/iptables-config | grep IPTABLES_MODULES
      IPTABLES_MODULES="nf_conntrack_ftp ip_nat_ftp"
  4. Restart the xinetd service to apply changes:
    service xinetd restart
  5. Open the passive port range in a firewall:
    Note: If there is an intermediate firewall between a Plesk server and the Internet, make sure that the passive port range is allowed in its configuration as well. Contact your Internet Service Provider for assistance.
    To open the ports in a local firewall, follow these steps:
    • Manually
      iptables -A INPUT -m state --state RELATED,ESTABLISHED -j ACCEPT
      # iptables -I INPUT 2 -p tcp --match multiport --dports 49152:65535 -j ACCEPT
      # service iptables save
    • Using Plesk Firewall (Recommended)
Read More

Thứ Ba, 22 tháng 10, 2019

Watch mysql processlist in (almost) real time

watch -n 1 “mysql -h 10.0.0.1 -u username -pPASSWORD -e ‘SHOW PROCESSLIST;'”
Read More

Thứ Hai, 21 tháng 10, 2019

.my.cnf – mysql user & password

.my.cnf – mysql user & password

This one is for lazy ones! If you are paranoid about security, do not use this.
Create file ~/.my.cnf and add following lines in it and replace mysqluser & mysqlpass values.
[client]
user=mysqluser
password=mysqlpass
For safety, make this file readable to you only by running chmod 0600 ~/.my.cnf 
Read More

Thứ Tư, 11 tháng 9, 2019

Lỗi exim directadmin unrouteable address


- unrouteable address exim
+ Lỗi do vượt ngưỡng gửi server quy định xem log
tail -f /var/log/exim/paniclog       
2019-09-11 16:12:11 1i7yfb-0005yS-AI failed to expand condition "${perl{check_limits}}" for lookuphost router: You (sotico) have reached your daily email limit of 1000 emails
+ Xem cấu hình trong server
vi /etc/virtual/limit -> cho các domain
echo 2000 > /etc/virtual/limit_sotico -> Tạo set cho từng domain khách hàng
Read More

Thứ Tư, 28 tháng 8, 2019

Compiling and Installing ModSecurity for NGINX Open Source

 – Install NGINX from Our Official Repository

If you haven’t already, the first step is to install NGINX. There are multiple ways to install NGINX, as is the case with most open source software. We generally recommend you install NGINX from the mainline branch in our official repository. For more details on how to properly install NGINX from our official repository, see our on‑demand webinar NGINX: Basics and Best Practices.
The instructions in this blog assume that you have installed NGINX from our official repository. They might work with NGINX as obtained from other sources, but that has not been tested.
Note: NGINX 1.11.5 or later is required.

2 – Install Prerequisite Packages

The first step is to install the packages required to complete the remaining steps in this tutorial. Run the following command, which is appropriate for a freshly installed Ubuntu/Debian system. The required packages might be different for RHEL/CentOS/Oracle Linux.
$ apt-get install -y apt-utils autoconf automake build-essential git libcurl4-openssl-dev libgeoip-dev liblmdb-dev libpcre++-dev libtool libxml2-dev libyajl-dev pkgconf wget zlib1g-dev

3 – Download and Compile the ModSecurity 3.0 Source Code

With the required prerequisite packages installed, the next step is to compile ModSecurity as an NGINX dynamic module. In ModSecurity 3.0’s new modular architecture, libmodsecurity is the core component which includes all rules and functionality. The second main component in the architecture is a connector that links libmodsecurity to the web server it is running with. There are separate connectors for NGINX, Apache HTTP Server, and IIS. We cover the NGINX connector in the next section.
To compile libmodsecurity:
  1. Clone the GitHub repository:
    $ git clone --depth 1 -b v3/master --single-branch https://github.com/SpiderLabs/ModSecurity
  2. Change to the ModSecurity directory and compile the source code:
    $ cd ModSecurity
    $ git submodule init
    $ git submodule update
    $ ./build.sh
    $ ./configure
    $ make
    $ make install
The compilation takes about 15 minutes, depending on the processing power of your system.
Note: It’s safe to ignore messages like the following during the build process. Even when they appear, the compilation completes and creates a working object.
fatal: No names found, cannot describe anything.

4 – Download the NGINX Connector for ModSecurity and Compile It as a Dynamic Module

Compile the ModSecurity connector for NGINX as a dynamic module for NGINX.
  1. Clone the GitHub repository:
    $ git clone --depth 1 https://github.com/SpiderLabs/ModSecurity-nginx.git
  2. Determine which version of NGINX is running on the host where the ModSecurity module will be loaded:
    $ nginx -v
    nginx version: nginx/1.13.1
  3. Download the source code corresponding to the installed version of NGINX (the complete sources are required even though only the dynamic module is being compiled):
    $ wget http://nginx.org/download/nginx-1.13.1.tar.gz
    $ tar zxvf nginx-1.13.1.tar.gz
  4. Compile the dynamic module and copy it to the standard directory for modules:
    $ cd nginx-1.13.1
    $ ./configure --with-compat --add-dynamic-module=../ModSecurity-nginx
    $ make modules
    $ cp objs/ngx_http_modsecurity_module.so /etc/nginx/modules

5 – Load the NGINX ModSecurity Connector Dynamic Module

Add the following load_module directive to the main (top‑level) context in /etc/nginx/nginx.conf. It instructs NGINX to load the ModSecurity dynamic module when it processes the configuration:
load_module modules/ngx_http_modsecurity_module.so;

6 – Configure, Enable, and Test ModSecurity

The final step is to enable and test ModSecurity.
  1. Set up the appropriate ModSecurity configuration file. Here we’re using the recommended ModSecurity configuration provided by TrustWave Spiderlabs, the corporate sponsors of ModSecurity.
    $ mkdir /etc/nginx/modsec
    $ wget -P /etc/nginx/modsec/ https://raw.githubusercontent.com/SpiderLabs/ModSecurity/v3/master/modsecurity.conf-recommended
    $ mv /etc/nginx/modsec/modsecurity.conf-recommended /etc/nginx/modsec/modsecurity.conf
  2. Change the SecRuleEngine directive in the configuration to change from the default “detection only” mode to actively dropping malicious traffic.
    $ sed -i 's/SecRuleEngine DetectionOnly/SecRuleEngine On/' /etc/nginx/modsec/modsecurity.conf
  3. Configure one or more rules. For the purposes of this blog we’re creating a single simple rule that drops a request in which the URL argument called testparam includes the string test in its value. Put the following text in /etc/nginx/modsec/main.conf:
    # From https://github.com/SpiderLabs/ModSecurity/blob/master/
    # modsecurity.conf-recommended
    #
    # Edit to set SecRuleEngine On
    Include "/etc/nginx/modsec/modsecurity.conf"
    
    # Basic test rule
    SecRule ARGS:testparam "@contains test" "id:1234,deny,status:403"
    In a production environment, you presumably would use rules that actually protect against malicious traffic, such as the free OWASP core rule set.
  4. Add the modsecurity and modsecurity_rules_file directives to the NGINX configuration to enable ModSecurity:
    server {
        # ...
        modsecurity on;
        modsecurity_rules_file /etc/nginx/modsec/main.conf;
    }
    
  5. Issue the following curl command. The 403 status code confirms that the rule is working.
    $ curl localhost?testparam=test
    <html>
    <head><title>403 Forbidden</title></head>
    <body bgcolor="white">
    <center><h1>403 Forbidden</h1></center>
    <hr><center>nginx/1.13.1</center>
    </body>
    </html>

Conclusion

ModSecurity is one of the most trusted and well‑known names in application security. The steps outlined in this blog cover how to compile ModSecurity from source and load it into open source NGINX.
Read More