Thứ Năm, 8 tháng 12, 2022

imunify-antivirus Scan and cleanup via CLI


Issue

Below you may find the method to scan and clean up accounts via the command-line interface.

Environment

Any supported environment for Imunify360/ImunifyAV.

Solution

  • To run a full scan which will check users one by one and functions identically like the 'Scall all' option in the GUI, you will need to use the following command:
# imunify360-agent malware user scan

or

# imunify-antivirus malware user scan
    • Otherwise, you can initiate the scanning of the specific directory with:
# imunify360-agent malware on-demand start --path /home/USER/subdirectory

or

# imunify-antivirus malware on-demand start --path /home/USER/subdirectory
  • To check the list of infected files found for a certain user, you may use the command below:
# imunify360-agent malware malicious list --user USERNAME --limit 500
  • As for the cleanup, if you are using Imunify360 or the extended version ImunifyAV+ that includes the cleanup option,
    • you can either set up the automatic cleanup so that all the detected files are cleaned upon detection. This can be set up in the Imunify360 > Settings > Malware tab > General section > Default action on detect.
    • Otherwise, you can initiate the cleanup process after the scanning process is finished using the malware command as follows:
# imunify360-agent malware malicious cleanup-all
    • If you wish to clean up files for a certain user on the server, you can use this one:
# imunify360-agent malware user cleanup USERNAME
    • You can then check the cleanup status via this command:
# imunify360-agent malware cleanup status


Useful links

Read More

Thứ Tư, 16 tháng 11, 2022

Troubleshooting WebResource.axd

 The .NET 2.0 framework changed the way clientside JavaScript is delivered to the browser. Previously, ASP.NET 1.1 used the aspnet_client directory whereas now 2.0 uses WebResource.axd.

When things go wrong, you'll see JavaScript errors about missing functions, including the now infamous 'WebForm_PostBackOptions is undefined'. After having this problem in one of my applications, doing a lot of googling on it, and eventually fixing it, I feel it's my turn to add to the fray of people writing about this in the hope that it helps someone.

There are a few things which can go wrong with WebResource.axd. Some of these are specific to compression (and in my case, the compression I'll be writing about is pretty specific to the Blowery module, however you might find some of the symptoms apply to other compression techniques), some are specific to Network Load balancing (NLB), and some are specific to IIS.

A few key things which can cause issues with WebResource.axd:

  • Missing compression exclusion
  • Slight error with compression module
  • Missing MachineKey / ValidationKey
  • Bad IIS setup, specifically the Application extension mapping

If you're lucky like I was, then you could have elements from all of the above in your environment. This makes for a lot of fun, especially given that the client errors can be somewhat intermittent. Unfortunately, I haven't managed to find much of a pattern to it. Some clients work, and some don't. You can break a working client, and you can fix a broken one, but it's kinda random. I know that's a fairly useless way to start out, but it gets better, I promise.

The first thing to do if you're having the JavaScript errors is to determine if they're being caused by a "missing" WebResource.axd. Simply view the source of the page which is breaking and find the js include line which references WebResource.axd. Copy the url, and paste it into your browser. You'll get a blank file loaded. Do this in a client which is working, and you'll get a file filled with JavaScript functions - funny that.

During my googling, I came across a few people who recommended simply getting the WebResource.axd from the cache of a working client, and copying it to the root of your application. I really don't advise this. On it's own, this didn't work for me anyway. My only thought is that these people intended you to update all the pages in your application and included a hardcoded reference to this file. Nasty. If you view the source of a lot of your pages, you'll notice that the include to WebResource.axd is made only on pages which need it. It's nice to let the .NET Framework decide these things rather than having to go through an entire application and work it out.

Compression
If you're running compression, you can confirm whether it's causing the problem by temporarily disabling it entirely. If you're using Blowery, then simply remove the httpmodule line in web.config (or web.configs if you're running in a load balanced environment), save, and test.

Disabling compression isn't really a great long term solution, so lets deal with this in a slightly more permanent way. First thing to do, is too add an exclusion for WebResource.axd in your web.config. If you're using blowery, it will look something like this:

<httpCompress preferredAlgorithm="deflate" compressionLevel="high">

<excludedMimeTypes>
<add type="image/jpeg"/>
<add type="image/gif"/>
</excludedMimeTypes>
<excludedPaths>
<add path="WebResource.axd"/>
</excludedPaths>
</httpCompress>

This is needed, however in my case it wasn't fixing all clients. It fixed some, but not all. After some frustrated googling and testing, I downloaded the latest version of Blowery (Blowery HttpCompress v6 for .net 2.0), and applied a small code change to line 85 of HttpCompress.cs:


From:
string realPath = app.Request.Path.Remove(0, app.Request.ApplicationPath.Length+1);

To:
string realPath = Path.GetFileName(app.Request.Path);

I found this code change via the DNN Forums: Http Compression and WebResource.axd.

Bad IIS Setup
If you're seeing 404 errors in your IIS logs (If you don't know where your application's logs are kept, then check Website Properties in IIS manager to find out. Clicking on 'Properties' next to the Enable Logging checkbox will bring up a dialog that will show you were the logs for this application are located.) then it's possible you need to make a change to your IIS config. From IIS Manager, select the properties for your application's website, and goto the 'Home Directory' tab. Click 'Configuration', then bring up the list of extension mappings on the 'Mappings' tab. You're obviously looking for .AXD, and if that's not there you need to create it. The important thing is to make sure "Verify File Exists" is deselected, as shown here:

If you have load balanced servers, then make sure you repeat this for all servers. Also you can probably do this at your top level website if you wanted to - the servers I was working on had a mix of ASP.NET 1.1 and 2.0 applications, so I tried to limit my changes to the end level website.

Network Load Balancing (NLB)
NLB is also known to cause issues with WebResource.axd. Even without thinking of clustering issues, it means you need to have your IIS setup properly twice. If you're having problems intermittently, then double check your config across both servers first and make sure they're identical. You can also hardcode an entry in your hosts file to specifically point to a single server in order to see if it works on one and not another. If you wanted to be incredibly drastic you could even break the NLB cluster, however I don't particularly recommend that option.

If your IIS setup is identical and you're still having issues, then check your MachineKey and ValidationKey nodes in your web.configs. They must be set to the same value on all nodes. If you're using something like SQL Session State, then this is probably going to be the case already. Here are a couple of useful links about MachineKey and ValidationKey:

Hopefully you'll find your symptoms and their solution in this article. If your problem turned out to be something different, please leave a comment or drop me a line so I can add your symptoms and solution here.

Update: If you're having AXD related problems with the SQL Server Report Viewer web control under Longhorn/IIS7, then this link might be of help to you.

Read More

Thứ Năm, 3 tháng 11, 2022

Netflow for CentOS

 Netflow


yum install nfdump libpcap-devel libpcap

wget https://storage.googleapis.com/google-code-archive-downloads/v2/code.google.com/softflowd/softflowd-0.9.9.tar.gz

tar xvzf softflowd-0.9.9.tar.gz

cd softflowd-0.9.9

./configure

make && make install


/bin/nfcapd -w -D -p 9995 -B 200000 -S 1 -P /var/run/nfsen/p9995.pid -z -I ns99 -l /root/nfsen/ns99

/usr/local/sbin/softflowd -i ens192 -n 127.0.0.1:9995


nfdump -M /root/nfsen/ns99  -T  -r 2022/11/02/nfcapd.202211022015 -a  -B -c 20

nfdump -M /root/nfsen/ns99  -T  -R 2022/11/02/nfcapd.202211021045:2022/11/02/nfcapd.202211022355 -a  -B -c 20

nfdump -M /root/nfsen/ns99  -T  -R 2022/11/02/nfcapd.202211021045:2022/11/02/nfcapd.202211022355 -n 10 -s ip/flows

Read More

Thứ Tư, 2 tháng 11, 2022

How to solve "error: Microsoft Visual C++ 14.0 or greater is required" when installing Python packages?

 I'm trying to install a package on Python, but Python is throwing an error on installing packages. I'm getting an error every time I tried to install pip install google-search-api.

Here is the error how can I successfully install it?

error: Microsoft Visual C++ 14.0 or greater is required. Get it with "Microsoft C++ Build Tools": https://visualstudio.microsoft.com/visual-cpp-build-tools/ 

Go to this link and download Microsoft C++ Build Tools:
https://visualstudio.microsoft.com/visual-cpp-build-tools/

You can also follow these steps here:

  1. Select: Workloads → Desktop development with C++
  2. Then for Individual Components, select only:
    • Windows 10 SDK
    • C++ x64/x86 build tools

You can also achieve the same automatically using the following command:

vs_buildtools.exe --norestart --passive --downloadThenInstall --includeRecommended --add Microsoft.VisualStudio.Workload.NativeDesktop --add Microsoft.VisualStudio.Workload.VCTools --add Microsoft.VisualStudio.Workload.MSBuildTools

Read More

Thứ Hai, 26 tháng 9, 2022

systemctl restart someservice returns “Error: No space left on device”

 If you have sufficient disk space and you are running Code42/Crashplan pro and you get “Error: No space left on device” when you use systemctl, this may be the fix

Linux performs real-time file watching using the inotify API. Inotify imposes a limit on the number of “watches” that can be in use on a system at any given time. If the Code42 app exceeds inotify’s max watch limit, real-time file watching fails to work properly, and some or all file changes are not detected until the Code42 app’s file verification scan runs.

Step 1: Find the current watch limit

Find the current inotify watch limit by examining the proc file system. In Terminal, run the following:

cat /proc/sys/fs/inotify/max_user_watches


Step 2: Change the watch limit

To change the watch limit value, edit the sysctl.conf file.
In this example, 1048576 is being set as the new value. Adjust this number as appropriate for your system.

  1. Edit /etc/sysctl.conf as root:
    sudo nano /etc/sysctl.conf
  1. Set (or add if it’s not present) the fs.inotify.max_user_watches parameter. Set this to the desired number of watches:
    fs.inotify.max_user_watches=1048576
  1. Save sysctl.conf and exit.
    If you’re using nano, press Control+X, followed by Y, then Enter to save the file.
  2. Either reboot the system or execute the following command:
    sudo sysctl -p /etc/sysctl.conf


Tested on Centos 7

Read More

Thứ Năm, 21 tháng 7, 2022

How can I connect to postgresql gitlab

 On 7.14.1:

cat /var/opt/gitlab/gitlab-rails/VERSION
7.14.1

I do this:

sudo -u gitlab-psql -i bash
/opt/gitlab/embedded/bin/psql --port 5432 -h /var/opt/gitlab/postgresql -d gitlabhq_production
psql (9.2.10)
Type "help" for help.

gitlabhq_production=# 

to connect to gitlabqh_production database.

For me, this also works:

sudo -u gitlab-psql /opt/gitlab/embedded/bin/psql -h /var/opt/gitlab/postgresql -d gitlabhq_production
psql (9.2.10)
Type "help" for help.

gitlabhq_production=# 
sudo -u gitlab-psql /opt/gitlab/embedded/bin/psql -h /var/opt/gitlab/postgresql -d gitlabhq_production 
works for me.
Read More

Thứ Ba, 7 tháng 6, 2022

Danh sách trạng thái tên miền Việt Nam

 Danh sách trạng thái tên miền:


- OK : tên miền không bị cấm hoạt động hoặc có trạng thái cấm nào.


- pendingDelete: tên miền đang chờ thu hồi.


- pendingCreate: tên miền đang được gửi lệnh đăng ký và chờ xử lý.


- pendingRenew: tên miền đang được gửi lệnh duy trì và chờ xử lý.


- pendingRestore: tên miền đang được gửi lệnh khôi phục và chờ xử lý. 


- pendingTransfer: tên miền đang được gửi lệnh chuyển đổi sang nhà đăng ký khác và chờ xử lý.


- pendingUpdate: tên miền đang được gửi lệnh cập nhật và chờ xử lý. 


- redemptionPeriod: tên miền đang trong thời gian chờ chuộc. Sẽ phải mất một phí khá lớn so với đăng ký để chuộc lại tên miền có trạng thái này.


- clientDeleteProhibited: cờ cấm không cho phép nhà đăng ký(registrar) thực hiện lệnh xóa tên miền. 


- clientRenewProhibited: cờ cấm không cho phép nhà đăng ký(registrar) thực hiện lệnh duy trì tên miền.


- clientTransferProhibited: cờ cấm không cho phép nhà đăng ký(registrar) thực hiện lệnh chuyển nhà đăng ký của tên miền. Mặc định khi đăng ký mới tên miền cờ trạng thái này sẽ được dựng lên. Để hạ cờ này xuống, bạn cần liên hệ với nhà đăng ký hiện tại của tên miền(ví dụ nhà đăng ký tên miền iNET).


- clientUpdateProhibited: cờ cấm không cho phép nhà đăng ký(registrar) thực hiện lệnh cập nhật tên miền.


- clientHold: tên miền bị tạm ngưng do yêu cầu của nhà đăng ký. Ví dụ: tên miền chưa cung cấp đủ bản khai, tên miền chưa xác nhận, tên miền tranh chấp...


- serverDeleteProhibited: cờ cấm được dựng lên do nhà quản lý đuôi tên miền(registry) thực hiện để không cho phép nhà đăng ký tên miền(registrar) thực hiện lệnh xóa tên miền.


- serverRenewProhibited: cờ cấm được dựng lên do nhà quản lý đuôi tên miền(registry) thực hiện để không cho phép nhà đăng ký tên miền(registrar) thực hiện lệnh duy trì tên miền..


- serverTransferProhibited: cờ cấm được dựng lên do nhà quản lý đuôi tên miền(registry) thực hiện để không cho phép nhà đăng ký tên miền(registrar) thực hiện lệnh chuyển đổi tên miền..


- serverUpdateProhibited: cờ cấm được dựng lên do nhà quản lý đuôi tên miền(registry) thực hiện để không cho phép nhà đăng ký tên miền(registrar) thực hiện lệnh cập nhật tên miền.


- serverHold: tên miền bị tạm ngưng do nhà quản lý đuôi tên miền(registry) thực hiện.

Read More

Thứ Tư, 1 tháng 6, 2022

How to install Phalcon framework for a PHP Plesk?


Question

How to install Phalcon framework for a PHP supplied by Plesk?

Answer

Note: Such kind of setup is not possible to set via Plesk Interface and this task should be performed by a system administrator via SSH.
Before performing the following actions make sure that required packages such a 'git' or 'build-essential' are installed and functioning properly.

  1. Connect to the server via SSH.

  2. Install the following packages and their dependencies.

    • For RHEL/CentOS/CloudLinux:

      yum install plesk-php*-devel pcre-devel gcc make

    • For Debian/Ubuntu:

      apt-get install plesk-php*-dev

  3. Clone phalcon git repo

    git clone -b '3.4.x' git://github.com/phalcon/cphalcon.git

  4. Go to cphalcon/build folder:

    cd cphalcon/build

  5. Run 'install' binary with appropriate options:

    ./install --phpize /opt/plesk/php/7.0/bin/phpize --php-config /opt/plesk/php/7.0/bin/php-config

    Note: Pay attention to paths to phpize and php-config specified in the command. If you install phalcon for some other PHP version, path should be set properly.

  6. Create /opt/plesk/php/7.0/etc/php.d/phalcon.ini configuration file with the following content:

    echo 'extension=phalcon.so > /opt/plesk/php/7.0/etc/php.d/phalcon.ini

  7. Make sure phalcon module is loaded fine.

    /opt/plesk/php/7.0/bin/php -m | grep phalcon
    phalcon

For more details refer to official guide by Phalcon Framework: https://github.com/phalcon/cphalcon

Read More

Thứ Bảy, 26 tháng 3, 2022

Hướng dẫn active Windows 2016, How to Upgrade Windows Server 2016 Evaluation to Full

 Hướng dẫn active Windows 2016, How to Upgrade Windows Server 2016 Evaluation to Full Version


Nếu bạn ban chạy bản Standard Evaluation thì bạn chỉ cần chạy lệnh sau để chuyển từ Evaluation qua Full và Active key luôn


dism /online /set-edition:ServerStandard /productkey:WC2BQ-8NRM3-FDDYY-2BFGV-KHKQY /accepteula


If you have installed Windows Server 2016 StandardEvaluation or DatacenterEvaluation (you can download it here after signup) to try the features of the new version of MSFT server platform, you have 180 days to test it. During this period, all features of Windows Server 2016 are available to you. After the trial period is over, the system starts to ask for activation and turns off every hour. The notification Windows License is expired is shown on your desktop. If you have found nothing better to do than to run productive tasks on the evaluation Windows Server 2016 version and want to upgrade it to full Windows Server edition, while keeping your data and without any need to completely reinstall the system, this article is for you.
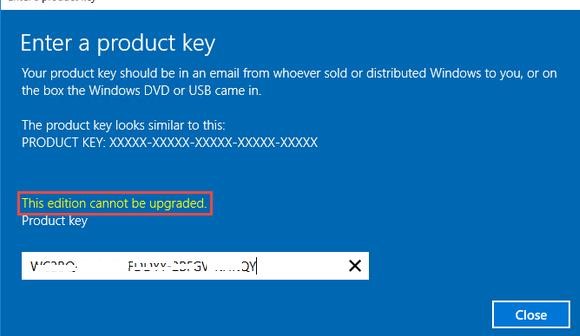
If you try to specify the KMS key or the Retail/MAK activation key for the RTM version in the Evaluation edition, the following warning appears: “This edition cannot be upgraded”. But not everything is so sad.

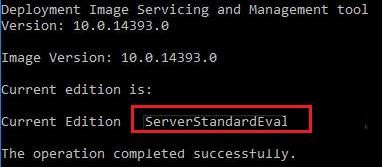
Let’s make sure that you are using the evaluation edition. Start the command prompt with the administrator privileges and run the following command:


DISM /online /Get-CurrentEdition


Get the list of editions you can convert your current Eval edition to:
DISM /online /Get-TargetEditions


As you can see, now we have ServerStandardEval edition, and it can be upgraded to the following Windows Server 2016 editions: ServerDatacenter or ServerStandard.


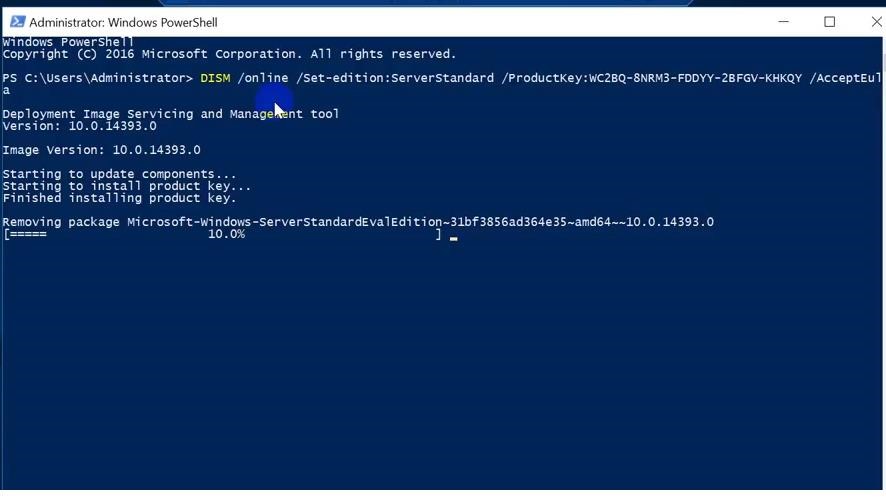
Using the public KMS key for Windows Server 2016, upgrade your Eval edition to Retail version of Windows Server 2016 Standard:


dism /online /set-edition:ServerStandard /productkey:WC2BQ-8NRM3-FDDYY-2BFGV-KHKQY /accepteula


Note. To upgrade to Datacenter edition, you need another key. The command will look like this:

DISM /online /Set-Edition:ServerDatacenter /ProductKey:CB7KF-BWN84-R7R2Y-793K2-8XDDG /AcceptEula


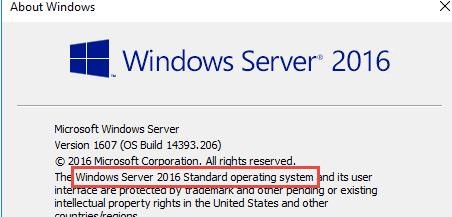
After you run this command, wait for it to finish (in some cases it may take several hours !!!). After that restart your server and make sure you have full Standard edition installed.
winver.exe


If you have got a KMS server in your network, you can use it for activation with the following commands:


slmgr /ipk WC2BQ-8NRM3-FDDYY-2BFGV-KHKQY
slmgr /ato


Or you can enter the MAK / Retail key and activate your OS online or by phone.
Here are some restrictions of these conversion means:
  • You can convert only the full GUI version of Windows Server. Server Core or Nano Server can’t be converted this way.
  • You cannot upgrade a server with a role of a domain controller (Active Directory Domain Services role). You must uninstall this role first.
Read More

Thứ Năm, 17 tháng 3, 2022

Hướng dẫn backup DirectAdmin với command line


Tổng quan

Trong bài này mình sẽ hướng dẫn các bạn backup DirectAdmin với command line nhanh chóng, đơn giản và dễ hiểu nhất. Nếu bạn không quen thao tác với command line thì có thể tham khảo bài viết Cách backup và restore DirectAdmin qua giao diện.

Mặc định trên giao diện DirectAdmin đã có tích hợp tính năng backup và restore rồi. Tuy nhiên vì một lý do nào đó như máy chủ của bạn mất mạng, giấy phép DirectAdmin của bạn hết hạn hoặc bạn vẫn thích sử dụng lệnh hơn giao diện thì đây chính là bài hướng dẫn cho bạn.

Nhưng trước hết chúng ta phải truy cập vào user root thông qua console hoặc SSH (Trường hợp có thể SSH được). Nếu bạn chưa biết cách SSH vào SSH vào VPS hoặc Server của bạn thì bạn có thể tham khảo bài viết hướng dẫn sau:

Sau khi đã đăng nhập được vào root chúng ta sẽ có 2 trường hợp để backup, đó là backup toàn bộ hoặc backup user lẻ. Mình sẽ hướng dẫn từng trường hợp bên dưới đầy đủ dể hiểu cho các bạn.

Trường hợp 1: Backup DirectAdmin với command line cho toàn bộ user

Để backup toàn bộ user chúng ta sử dụng lệnh sau.

  
AZDIGI Tutorial
echo "action=backup&append%5Fto%5Fpath=nothing&database%5Fdata%5Faware=yes&email%5Fdata%5Faware=yes&local%5Fpath=%2Fhome%2Fadmin%2Fadmin%5Fbackups&owner=admin&type=admin&value=multiple&when=now&where=local&who=all" >> /usr/local/directadmin/data/task.queue
    

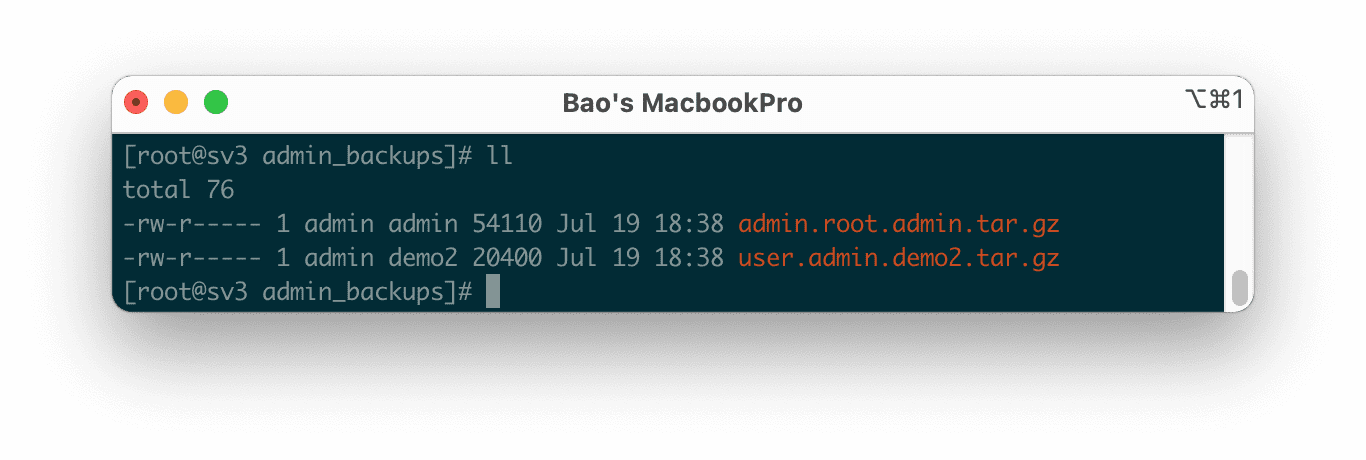
Ở trên VPS của mình hiện tại chỉ có 1 user và admin nên sau khi chạy lệnh trên và chờ khoảng vài phút thì trong thư mục /home/admin/admin_backups xuất hiện hai tệp tin backup như hình sau.

Trước khi chạy lệnh, chưa có một tệp tin backup nào cả.

Sau khi chạy lệnh backup chúng ta đã có 2 tệp tin backup tương ứng với các user đang có. Trong trường hơp bạn có rất nhiều user hơn thì cần chờ nhiều thời gian hơn và các file sau khi backup sẽ có dần từng file một. Trong trường hợp dung lượng của bạn không đủ để backup đầy đủ tất cả các user thì đến khi đầy hệ thống tự động dừng lại không backup tiếp nữa.

Trường hợp 2: Backup DirectAdmin với command line cho một user duy nhất

Để backup một user chúng ta sử dụng lệnh sau.

  
AZDIGI Tutorial
echo "action=backup&append%5Fto%5Fpath=nothing&database%5Fdata%5Faware=yes&email%5Fdata%5Faware=yes&local%5Fpath=%2Fhome%2Fadmin%2Fadmin%5Fbackups&owner=admin&select%30=testuser&type=admin&value=multiple&when=now&where=local" >> /usr/local/directadmin/data/task.queue
    

Thay thế testuser thành tên user mà bạn muốn restore.

Ở đây mình có một user tên là demo2 mình sẽ sử dụng lệnh sau để tiến hành sao lưu user này.

  
AZDIGI Tutorial
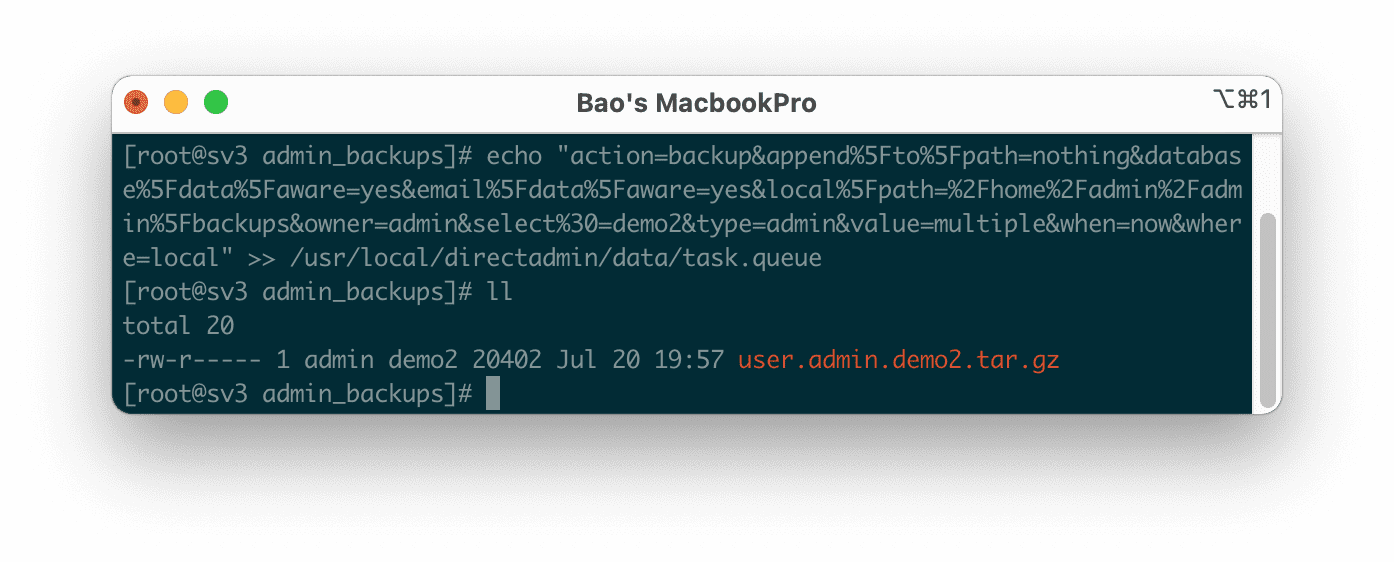
echo "action=backup&append%5Fto%5Fpath=nothing&database%5Fdata%5Faware=yes&email%5Fdata%5Faware=yes&local%5Fpath=%2Fhome%2Fadmin%2Fadmin%5Fbackups&owner=admin&select%30=demo2&type=admin&value=multiple&when=now&where=local" >> /usr/local/directadmin/data/task.queue
    

Sau khi chạy lệnh chúng ta chờ một lát sẽ thấy tệp tin backup đầy đủ của user này tại /home/admin/admin_backup/:

backup DirectAdmin với command line restore

Trong trường hợp bạn muốn khôi phục user demo2 này bạn sử dụng lệnh sau:

  
AZDIGI Tutorial
echo "action=restore&ip%5Fchoice=file&local%5Fpath=%2Fhome%2Fadmin%2Fadmin%5Fbackups&owner=admin&select%30=user%2Eadmin%2Edemo2%2Etar%2Egz&type=admin&value=multiple&when=now&where=local" >> /usr/local/directadmin/data/task.queue
    

Các bạn nhớ thay demo2 thành user của bạn nhé. Trường hợp file backup của bạn tên khác thì bạn nhớ thay thế các tên giữ %2E(Giá trị hex, tương đương cho dấu chấm). Các bạn cũng có thể sử dụng định dạng demo2%2Etar%2Egz thì nó cũng hoạt động tốt.

Lệnh khôi phục này sẽ sử dụng chính IP ở trong cấu hình của tệp tin sao lưu này. Nếu bản sao lưu này trên chính VPS hoặc Server này tạo ra thì không vấn đề gì, nhưng nếu đây là tệp tin sao lưu đến từ VPS hoặc Server khác thì bạn cần thêm tùy chọn ip_choice=select&ip=1.2.3.4 trong đó 1.2.3.4 bạn chỉnh lại thành IP VPS hoặc Server của bạn.

Vậy là xong các bước backup DirectAdmin với command line cho một user duy nhất.

Tổng kết

Như vậy là bạn đã nắm cách backup DirectAdmin với command line cũng như khôi phục lại một user cũng bằng command line. Hy vọng bài viết này sẽ giúp ích cho các bạn trong nhiều trường hợp.

Bài viết tham khảo:

Read More