Thứ Bảy, 26 tháng 3, 2022

Hướng dẫn active Windows 2016, How to Upgrade Windows Server 2016 Evaluation to Full

 Hướng dẫn active Windows 2016, How to Upgrade Windows Server 2016 Evaluation to Full Version


Nếu bạn ban chạy bản Standard Evaluation thì bạn chỉ cần chạy lệnh sau để chuyển từ Evaluation qua Full và Active key luôn


dism /online /set-edition:ServerStandard /productkey:WC2BQ-8NRM3-FDDYY-2BFGV-KHKQY /accepteula


If you have installed Windows Server 2016 StandardEvaluation or DatacenterEvaluation (you can download it here after signup) to try the features of the new version of MSFT server platform, you have 180 days to test it. During this period, all features of Windows Server 2016 are available to you. After the trial period is over, the system starts to ask for activation and turns off every hour. The notification Windows License is expired is shown on your desktop. If you have found nothing better to do than to run productive tasks on the evaluation Windows Server 2016 version and want to upgrade it to full Windows Server edition, while keeping your data and without any need to completely reinstall the system, this article is for you.
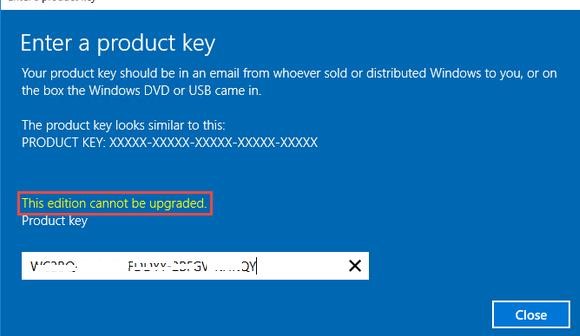
If you try to specify the KMS key or the Retail/MAK activation key for the RTM version in the Evaluation edition, the following warning appears: “This edition cannot be upgraded”. But not everything is so sad.

Let’s make sure that you are using the evaluation edition. Start the command prompt with the administrator privileges and run the following command:


DISM /online /Get-CurrentEdition


Get the list of editions you can convert your current Eval edition to:
DISM /online /Get-TargetEditions


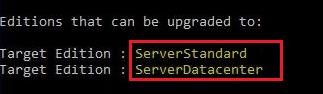
As you can see, now we have ServerStandardEval edition, and it can be upgraded to the following Windows Server 2016 editions: ServerDatacenter or ServerStandard.


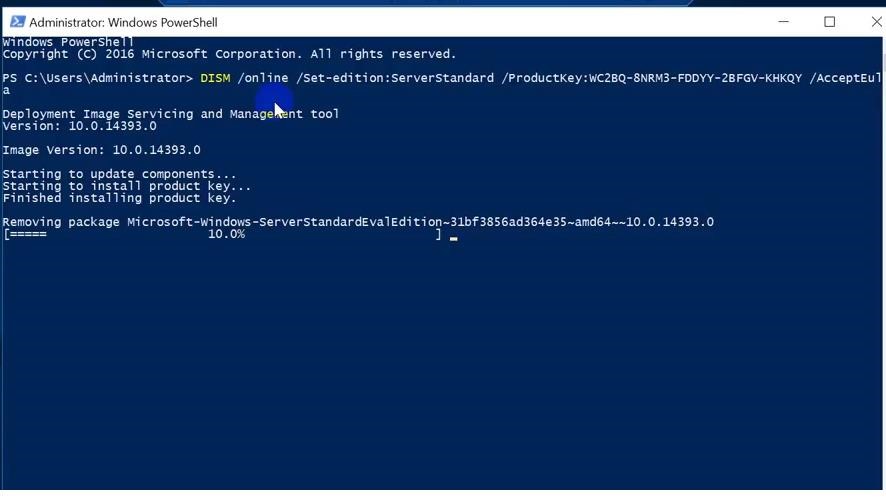
Using the public KMS key for Windows Server 2016, upgrade your Eval edition to Retail version of Windows Server 2016 Standard:


dism /online /set-edition:ServerStandard /productkey:WC2BQ-8NRM3-FDDYY-2BFGV-KHKQY /accepteula


Note. To upgrade to Datacenter edition, you need another key. The command will look like this:

DISM /online /Set-Edition:ServerDatacenter /ProductKey:CB7KF-BWN84-R7R2Y-793K2-8XDDG /AcceptEula


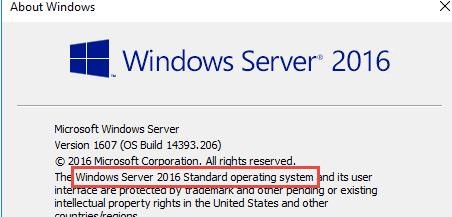
After you run this command, wait for it to finish (in some cases it may take several hours !!!). After that restart your server and make sure you have full Standard edition installed.
winver.exe


If you have got a KMS server in your network, you can use it for activation with the following commands:


slmgr /ipk WC2BQ-8NRM3-FDDYY-2BFGV-KHKQY
slmgr /ato


Or you can enter the MAK / Retail key and activate your OS online or by phone.
Here are some restrictions of these conversion means:
  • You can convert only the full GUI version of Windows Server. Server Core or Nano Server can’t be converted this way.
  • You cannot upgrade a server with a role of a domain controller (Active Directory Domain Services role). You must uninstall this role first.
Read More

Thứ Năm, 17 tháng 3, 2022

Hướng dẫn backup DirectAdmin với command line


Tổng quan

Trong bài này mình sẽ hướng dẫn các bạn backup DirectAdmin với command line nhanh chóng, đơn giản và dễ hiểu nhất. Nếu bạn không quen thao tác với command line thì có thể tham khảo bài viết Cách backup và restore DirectAdmin qua giao diện.

Mặc định trên giao diện DirectAdmin đã có tích hợp tính năng backup và restore rồi. Tuy nhiên vì một lý do nào đó như máy chủ của bạn mất mạng, giấy phép DirectAdmin của bạn hết hạn hoặc bạn vẫn thích sử dụng lệnh hơn giao diện thì đây chính là bài hướng dẫn cho bạn.

Nhưng trước hết chúng ta phải truy cập vào user root thông qua console hoặc SSH (Trường hợp có thể SSH được). Nếu bạn chưa biết cách SSH vào SSH vào VPS hoặc Server của bạn thì bạn có thể tham khảo bài viết hướng dẫn sau:

Sau khi đã đăng nhập được vào root chúng ta sẽ có 2 trường hợp để backup, đó là backup toàn bộ hoặc backup user lẻ. Mình sẽ hướng dẫn từng trường hợp bên dưới đầy đủ dể hiểu cho các bạn.

Trường hợp 1: Backup DirectAdmin với command line cho toàn bộ user

Để backup toàn bộ user chúng ta sử dụng lệnh sau.

  
AZDIGI Tutorial
echo "action=backup&append%5Fto%5Fpath=nothing&database%5Fdata%5Faware=yes&email%5Fdata%5Faware=yes&local%5Fpath=%2Fhome%2Fadmin%2Fadmin%5Fbackups&owner=admin&type=admin&value=multiple&when=now&where=local&who=all" >> /usr/local/directadmin/data/task.queue
    

Ở trên VPS của mình hiện tại chỉ có 1 user và admin nên sau khi chạy lệnh trên và chờ khoảng vài phút thì trong thư mục /home/admin/admin_backups xuất hiện hai tệp tin backup như hình sau.

Trước khi chạy lệnh, chưa có một tệp tin backup nào cả.

Sau khi chạy lệnh backup chúng ta đã có 2 tệp tin backup tương ứng với các user đang có. Trong trường hơp bạn có rất nhiều user hơn thì cần chờ nhiều thời gian hơn và các file sau khi backup sẽ có dần từng file một. Trong trường hợp dung lượng của bạn không đủ để backup đầy đủ tất cả các user thì đến khi đầy hệ thống tự động dừng lại không backup tiếp nữa.

Trường hợp 2: Backup DirectAdmin với command line cho một user duy nhất

Để backup một user chúng ta sử dụng lệnh sau.

  
AZDIGI Tutorial
echo "action=backup&append%5Fto%5Fpath=nothing&database%5Fdata%5Faware=yes&email%5Fdata%5Faware=yes&local%5Fpath=%2Fhome%2Fadmin%2Fadmin%5Fbackups&owner=admin&select%30=testuser&type=admin&value=multiple&when=now&where=local" >> /usr/local/directadmin/data/task.queue
    

Thay thế testuser thành tên user mà bạn muốn restore.

Ở đây mình có một user tên là demo2 mình sẽ sử dụng lệnh sau để tiến hành sao lưu user này.

  
AZDIGI Tutorial
echo "action=backup&append%5Fto%5Fpath=nothing&database%5Fdata%5Faware=yes&email%5Fdata%5Faware=yes&local%5Fpath=%2Fhome%2Fadmin%2Fadmin%5Fbackups&owner=admin&select%30=demo2&type=admin&value=multiple&when=now&where=local" >> /usr/local/directadmin/data/task.queue
    

Sau khi chạy lệnh chúng ta chờ một lát sẽ thấy tệp tin backup đầy đủ của user này tại /home/admin/admin_backup/:

backup DirectAdmin với command line restore

Trong trường hợp bạn muốn khôi phục user demo2 này bạn sử dụng lệnh sau:

  
AZDIGI Tutorial
echo "action=restore&ip%5Fchoice=file&local%5Fpath=%2Fhome%2Fadmin%2Fadmin%5Fbackups&owner=admin&select%30=user%2Eadmin%2Edemo2%2Etar%2Egz&type=admin&value=multiple&when=now&where=local" >> /usr/local/directadmin/data/task.queue
    

Các bạn nhớ thay demo2 thành user của bạn nhé. Trường hợp file backup của bạn tên khác thì bạn nhớ thay thế các tên giữ %2E(Giá trị hex, tương đương cho dấu chấm). Các bạn cũng có thể sử dụng định dạng demo2%2Etar%2Egz thì nó cũng hoạt động tốt.

Lệnh khôi phục này sẽ sử dụng chính IP ở trong cấu hình của tệp tin sao lưu này. Nếu bản sao lưu này trên chính VPS hoặc Server này tạo ra thì không vấn đề gì, nhưng nếu đây là tệp tin sao lưu đến từ VPS hoặc Server khác thì bạn cần thêm tùy chọn ip_choice=select&ip=1.2.3.4 trong đó 1.2.3.4 bạn chỉnh lại thành IP VPS hoặc Server của bạn.

Vậy là xong các bước backup DirectAdmin với command line cho một user duy nhất.

Tổng kết

Như vậy là bạn đã nắm cách backup DirectAdmin với command line cũng như khôi phục lại một user cũng bằng command line. Hy vọng bài viết này sẽ giúp ích cho các bạn trong nhiều trường hợp.

Bài viết tham khảo:

Read More

Thứ Sáu, 11 tháng 3, 2022

Block wp-login and xmlrpc brute force attacks with CSF / cPanel

 Another great counter attack to “flooders” on your WordPress installations. This time with CSF firewall. I had massive brute force attacks on WordPress installations on some cPanel server which were causing very high server loads.  Here is great way to block abusers with CSF firewall. Here is how.

First, create custom log from which CSF will be able to search for wp-login.php and xmlrpc.php requests. Edit your /etc/csf/csf.conf like bellow:

CUSTOM1_LOG = "/var/log/apache2/domlogs/*/*"

Because majority of those attacks are from some very well known country’s that are causing problems, you may want to white list country’s from which users shouldn’t be blocked. Add list of white list country’s in CC_IGNORE.

Then you must create custom functions for CSF so it will be able to block those attacks. Add this to your /usr/local/csf/bin/regex.custom.pm file. If it’s not there, create one. Then add this:

# XMLRPC
if (($globlogs{CUSTOM1_LOG}{$lgfile}) and ($line =~ /(\S+).*] "\w*(?:GET|POST) \/xmlrpc\.php.*" /)) {
return ("WP XMLPRC Attack",$1,"XMLRPC","5","80,443","1");
}

# WP-LOGINS
if (($globlogs{CUSTOM1_LOG}{$lgfile}) and ($line =~ /(\S+).*] "\w*(?:GET|POST) \/wp-login\.php.*" /)) {
return ("WP Login Attack",$1,"WPLOGIN","5","80,443","1");
}

Restart CSF and check if LFD is doing his new job. On success you should see something like this:

May 10 11:33:16 cp lfd[589350]: (WPLOGIN) WP Login Attack 4.4.4.4 (PL/Poland/s1.hekko.net.pl): 5 in the last 600 secs - *Blocked in csf* [LF_CUSTOMTRIGGER]
May 10 11:33:36 cp lfd[589587]: (WPLOGIN) WP Login Attack 5.5.5.5 (TR/Turkey/5.5.5.5.linuxhosting.com.tr): 5 in the last 600 secs - *Blocked in csf* [LF_CUSTOMTRIGGER]
May 10 11:34:24 cp lfd[590012]: (WPLOGIN) WP Login Attack 6.6.6.6 (DE/Germany/static.6.6.6.6.clients.your-server.de): 5 in the last 600 secs - *Blocked in csf* [LF_CUSTOMTRIGGER]83247]: (WPLOGIN) WP Login Attack 7.7.7.7 (VN/Vietnam/-): 5 in the last 600 secs - *Blocked in csf* [LF_CUSTOMTRIGGER]
...

Requests for ignored country’s should look like this:

May 10 11:45:36 cp lfd[591718]: WP Login Attack 1.1.1.1 - ignored
May 10 11:45:41 cp lfd[591718]: WP Login Attack 2.2.2.2 - ignored
...

I hope this helps

Read More